Magazine Cover & developing ideas...
- amiedodgsonart
- Oct 23, 2019
- 4 min read
Updated: Nov 8, 2019
The objective for today's session in the studio was a to learn and create our own High key images using studio lighting set ups. High key photography uses unnaturally bright lighting to reduce or remove the shadows in an image. You see high key used regularly for fashion and portrait photography. A high Key Lighting Set-Up ideally has a minimum of three lights, and a seamless white backdrop. We positioned 2 lights at roughly 45 degrees to the white background. We positioned the ‘Key Light’ (main light) at the front, this light was angled directly at the model.Nadine was my model and she was positioned in the centre in front of the background.
The lighting set up was similar to the picture below.

We tested the light on the background using a light meter and we were looking for a reading around F/11.
We made sure the camera was on the same ISO as the light meter, ISO 320.
The other settings we used were F/6.3, 1/125 shutter speed.
Below is an unprocessed and un retouched photo of Nadine my model in high key lighting. What worked well about this image was the model's expression and the focus of the image being drawn in by the expression. However I didn't like the lighting on this image even though technically it worked.

For the picture below I turned down the two light facing the background by a few stops to give a darker background. This is another unprocessed and unedited image of Nadine. It is slightly out of focus on her eyes which I didn't like however the lighting, for me, was a lot better. It gave a softer look to the face rather than the harsh look the high key lighting was giving.

After editing the image below I was quite happy with it. The lighting worked well giving a soft look due to the soft box in front of her and I also like the sharpness of the features on her face. I definitely preferred the darker background to the high key lighting. It would work even better in monochrome.

Through using photoshop to play around with the imagery, I was able to turn them to monochrome which I felt worked really well. By super imposing Nadine's face onto the background I was able to create an image which portrayed many different moods. I called it, "the expressions of Nadine".

I created the below image by using the clone tool in photoshop and cloning Nadine's face from another image opened in photoshop. This worked really well. It would have been even better if I had edited out the bottom of the background below and if I had directed Nadine to lift her cardigan on to her should as I think it distracts the eye in the image.

We were set the task to produce a magazine cover based around gender. I have decided to use a speed light rather than take the high key lighting moving forward as I don't like the effect. I have followed a photographers work for a long time named Terry Richardson and I really like his use of direct flash. I plan to take my photography forward and develop a 'Terry Richardson' style front cover picture as I love the raw and unpolished look to his work. Having learnt high key lighting I am happy as I now know how to use it should I feel the need or want to in future projects for high end processing, however don't feel it suits my style of photography.
Development of ideas...
Below are shots that I took of Dave. I wanted him to look feminine and the shots to be raw and in the style of Terry Richardson with direct flash. I am planning to merge these shots with the ones of Katy to begin my project on photo manipulation in gender.

The red lipstick, floral shirt and Dave's expression really worked well on these shot. I don't feel the editing is quite there yet though and I feel that is more down to the lighting and camera settings as I don't like over edited shots that try and make up for the lost light to begin with. It can make the images look over contrasted. I also need to work on editing the background so it looks cleaner around the edges.

Magazine Cover Shoot
The objective of the magazine shoot was to create a magazine front cover in reaction to our gender project. I did a shoot with Katy and asked her to dress and pose like a man. I felt she did an amazing job. I then edited the shot in photoshop, but there was barely any editing done as I wanted to carry on the theme of them being quite raw and simple. I took the inspiration from ID magazine as you can see my inspiration pictures below. I will talk through the process of how I made the magazine cover on a more detailed post blog post.


I have some more images of Katy to edit. I will try photo-manipulation with these shots and the ones of Dave. The idea is to merge genders to show that gender can be fluid.
Further research into gender...
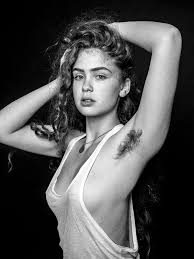
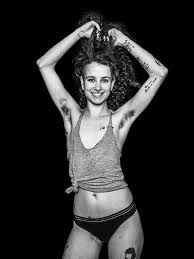
Women with body hair...
I touched on some research into women with body hair. What I found was that it is stereotypical for men to have underarm hair and not women. So I would like to do another shoot of Katy showing her underarm hair. Pictures to follow.


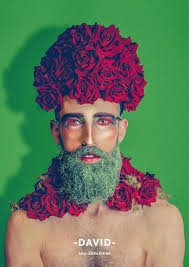
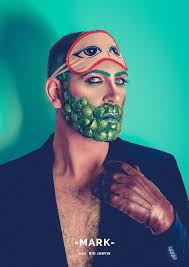
These shots are my inspiration for the males dressed as women shoots.


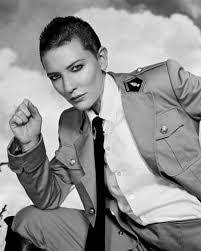
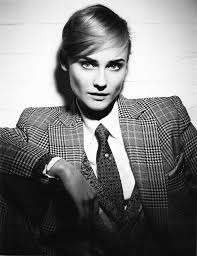
These shots are inspiration for my women dressed as males shoots. I used these as inspiration for Katy when I was doing the magazine shoot.


I would love to try this kind of thing and plan to print off some of my images of people and cut them up and do a collage face. However I also plan to try this on photoshop.


Comments