Studio Lighting Techniques...
- amiedodgsonart
- Dec 11, 2019
- 6 min read
We were introduced to a range of studio lighting techniques to extend our studio practice. This was a really informative workshop that gave me a range of ideas for my final outcome for the inside outside project.
High Key
We covered High key photography in the last project and it uses unnaturally bright lighting to reduce or remove the shadows in an image and is used regularly for fashion and portrait photography.
Ideally you'll have a minimum of three lights, and a seamless white backdrop. Many professionals mount a 9 ft wide roll of paper, a colorama high on stands or as we have in the college studio, on a roll down. Positioning 2 lights at roughly a 45 degree angle to the white background. The brightness of these lights needs to be 1 or 2 stops brighter than the light on the subject. This is how you achieve the pure white effect on the background.
The next step is to position the ‘Key Light’, which is the main light, at the front. This light is usually angled directly at the subject that is positioned centrally in front of the colorama.
The Set up

We experimented and I was a bit disappointed with my shots, however we were told that it can take hours to figure out a decent set up especially if you're new to studio flash.
Things to remember:
- light bouncing off your backdrop causing strange halos around the subject or lens flare.
- to make sure you're over exposing the backdrop enough to get a fairly solid white, but not so bright it starts to bleed into the skin of the model.
My Attempt after post production

What worked well:
- I managed to over expose the background so it wasn't bleeding into Nadine's arm.
- There is little shadows on the subject which is what I was aiming for in high key.
Even Better if:
- The models expression was slightly more engaged - she looks bored!
- I had asked her to take up her cardigan on her left side as it detracts from the photo.
However all in all, the lighting set up was good. I doubt I will use this technique much as I am not into fashion photography, however it is always good to know!
Jill Greenberg (click the name to view website)
We were also introduced to Jill Greenberg's style lighting. She is highly recognised for her distinct, and stylized photography of celebrities and well known performers. Examples of her work below.


The set up
This is the usual set up that Jill Greenburg uses, however we didn't have enough lights in the studio to do this. Instead we still used the light on the background to form a ring around the subject , 2 soft boxes either side of the subject and just behind so the light would just catch the sides of the face, and then one soft box directed straight at the subject.

The Process
It took the group a while to get the right set up. I was being particularly fussy in regards to the background rim light. We couldn't quite get the right effect, it was either too bright, too small or the subject wasn't directly in front of the rim effect. We tried using various heads for the light; a honeycomb, which made the light more intense, a cone, which made the light smaller. We finally stuck with one thing and that was to have no fixtures on the light. We used a light meter to check the exposure of the soft box directly in front of the subject and changed the camera settings to match. we shot at F/8, 1/125 and ISO 100. We tried using different reflectors either side at the front of the subject to make up for the lack of silver reflecting umbrella lights.
My Attempt after post production
I did very little in post production. I feel I could have done more to make it similar to Jill Greenberg's style, however I felt it was good to capture the lighting rather than concentrate on the editing.

What worked well:
- The light either side of him catching the sides of his face and hair.
- The rim light on the background being visible.
- Fahad's expression
Even better if:
- I had asked Fahad to stay more central so the rim light was directly behind him.
- The whole shot looks a little dull so maybe I could have brought in silver reflectors either side in front of him or better still use lights!
- I had cropped the image in tighter so it didn't have so much negative space at the top.
Rim Lighting
The next technique we were introduced to was rim lighting. I have actually done a little rim lighting in the past therefore I kind of knew where the lights needed to be. It is a lighting technique where the image subject is backlit and the image is exposed to hide the subject features in shadow. The technique gets its name from the fact that lighting a subject in this way produces a thin line or 'rim' of light which appears to cling to the subjects outline.
The set up
Below is a usual set up for rim lighting, however we placed a thin strip box either side of the subject, experimenting with moving it forward and backwards to get the desired effect. We didn't use an octabank. It was quite tricky and took a few attempts to get the settings just right.

The camera settings were F/6.3, 1/125 and ISO 100. We didn't use a light meter for this one.
My Attempt
These were my favourite shots and technique from the studio lighting workshop.


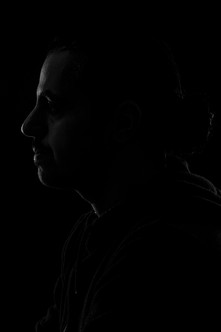

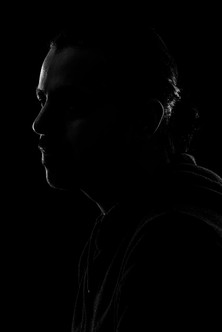


What worked well:
- The rim lighting effect.
- The dark and moodiness of them.
- Fahad's expressions.
- My direction to Fahad.
- The post-production turning them black and white really works for the mood of the shot.
Even better if:
- I could have possibly turned the lighting up a stop on either side.
- On the two side profiles I think I could have tweeted the lighting so it touched his back a bit more.
- To take this technique further and to add to the shot I feel maybe adding a low light with a coloured gel over the top would bring another element of darkness to the shot.
- Try editing them in colour.
Using coloured gels
The last technique we covered was to bring coloured gels into the mix. A colour gel or colour filter, also known as lighting gel or simply gel, is a transparent coloured material that is used in theater, event production, photography, videography and cinematography to colour light and for colour correction. They can bring a different mood to the image. A red colour gel will warm up and intensify the portrait photography. A blue gel will add a hint of coldness, and an almost eerie mood to your pictures. It’s a fun way to add interest to images and make them stand out.
Things to remember:
- Always choose colours that are complementary to each other.
- Make sure the colour gel evokes the right mood.
- Make sure if using another light, that it doesn’t overpower the light from the colour gel. Otherwise, the exposure may get blown out.

The set up
The set up we began with was to fire one coloured gel light at two boards put together to make a 'V' shape. This diffused the light and didn't give me the desired effect. I chose red and blue and had one on each light, either side of the subject so the light was just clipping the face and put a soft box on a boom arm in front of the subject to light up the face. Similar to the rim lighting set up however this time in stead of using soft boxes either side, we put gel covers on instead. We also added a soft box in front. The camera settings were F/8, 1/125/, ISO 100.
My Attempt
I really liked the effect of the gels and plan to experiment a bit more when I have some time. I am happy with the results and played around a bit more with these in post-production adding filters in camera RAW that are already in the settings.

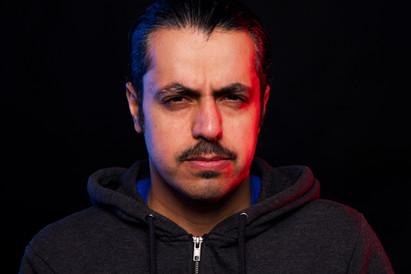


What worked well:
- The coloured gels I used complimented the image well.
- Fahad's expressions were great thanks to my direction.
- The post-production on each one compliments the style of the lighting.
Even better if:
- To take this further I would play around with different coloured gels and having more of a think of what kind of idea I would like and the message I am trying to portray with each colour.
- This lighting would work well for the colour theory work I have been doing in relation to the project inside outside. Matching colours to different emotions. Therefore I would take this further by matching different colours to different emotions.
All in all this workshop was great, I had a lot of fun and learnt a lot. It gave me more skills to add to my creative practice when doing fine art photography. My favourite lighting set ups that I think I will take further into other projects are the rim lighting and the coloured gels. They compliment fine art photography well by creating different moods and messages. I can see myself coming up with all sorts of concepts to use and put these lighting techniques to good practice.
Comments